Songscription AI: Turn Your Music into Sheet Music with One Click (Free Version!)
As a creator, have you ever hit this wall? You’ve just generated an amazing track (maybe using Suno or Udio), but because you don’t have the sheet music, you can’t actually play it on your piano or remix it. It’s a total buzzkill for your creative flow.
That’s where Songscription AI comes in. In this guide, I’ll show you how to use this tool to automatically generate professional sheet music and turn your tracks into an interactive piano-learning interface.
The best part? The free version is actually useful. Let’s dive in.
What Exactly is Songscription AI?
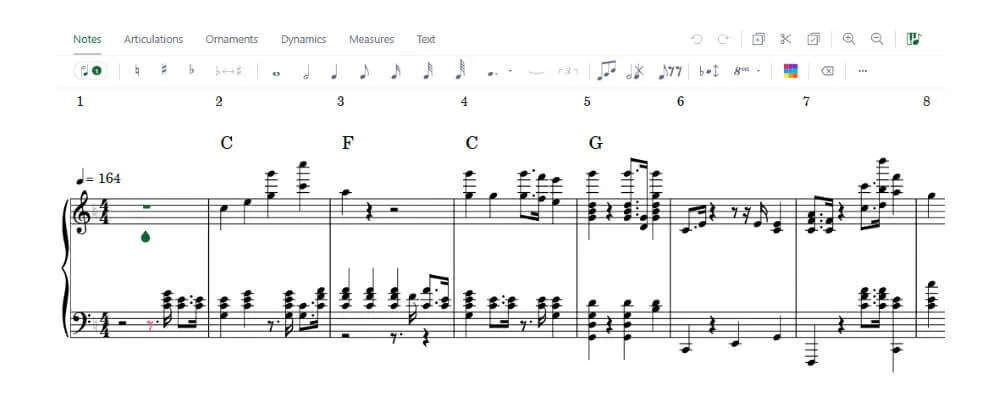
At its core, Songscription is an AI-powered transcription tool that does one thing incredibly well: it takes your audio files and turns them into readable sheet music. No more manual transcribing or guessing notes by ear.
Key Features You’ll Love:
- Versatile Inputs: You can upload an audio file, paste a YouTube link, or even record yourself playing live.
- Two Smart Generation Modes: * Piano Cover: Perfect for turning a song into a solo piano arrangement.
- Transcription: Best for capturing multiple instruments from a complex track.
- Interactive Editing: It’s not just a static PDF. You can jump into the “Piano Roll” editor to tweak notes, fix timing, or change the arrangement yourself.
- Synthesia-Style Visuals: It includes a “waterfall” visualization (similar to Synthesia), making it way more fun (and easier) to practice your new song.
How to Use Songscription AI: A Step-by-Step Guide
Getting your hands on a professional score shouldn’t be a headache. Here is the exact workflow I use to get the best results.
Step 1: Sign Up (The Easy Way)
First, head over to the Songscription official website. Look for the “Sign Up” button in the top right corner.
- Blogger Tip: Don’t waste time filling out forms. Just hit the “Continue with Google” option for a one-click login. It’s fast, secure, and gets you straight to the dashboard.
Step 2: Feeding the AI Your Music
Once you’re in, you’ll see the upload zone on the right side of your screen. You’ve got three ways to get your audio into the system:
- Upload Audio: Drag and drop your local MP3 or WAV files.
- YouTube Link: This is a game-changer. Just paste the URL of any music video, and the AI handles the rest.
- Record: Feeling inspired? You can record your own singing or humming directly through your mic.
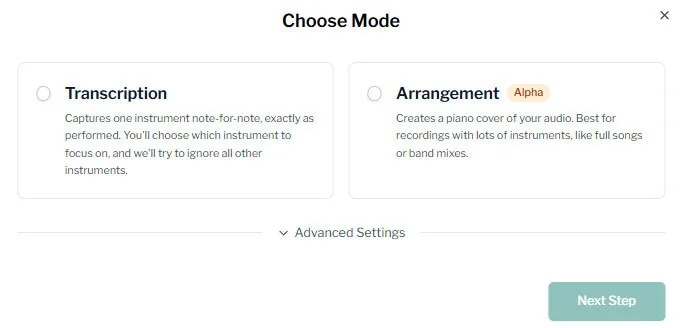
Step 3: Pick Your Mode (Piano vs. Full Transcription)
This is where the magic happens. Songscription AI offers two distinct modes, and choosing the right one depends on your goal:
- Piano Cover (The “Right” Option): * Best for: Practice and solo performance.
- How it works: The AI rearranges the song into a pure piano version. While you can’t pick specific instruments here, the result sounds remarkably close to the original vibe of the track. It’s the go-to choice if you just want to sit down and play.
- Transcription (The “Left” Option): * Best for: Music analysis and remixing.
- How it works: This mode is more granular. You can select specific instruments like Guitar, Bass, or Flute. If you’re trying to deconstruct a complex track to see exactly what the bassline is doing, pick this one.
Fine-Tuning & Getting the Perfect Result
Before you hit the “Go” button, there are a few expert settings that can make or break your transcription.
Advanced Settings: For the Music Nerds
If you have a background in music theory, don’t skip the Advanced Settings. Here, you can manually set the BPM (Beats Per Minute) and the Key Signature.
- Pro Tip: If you have no clue what the key is, don’t stress. Just leave it on Auto-detect. The AI is surprisingly accurate at figuring it out on its own.
The Final Check
Once you’re satisfied with the settings, click Next Step. You’ll see a copyright confirmation page—standard legal stuff. Give it a quick read, hit “Transcribe,” and let the AI work its magic.
The Editor: Adding the “Human Touch”
Let’s be real: AI is amazing, but it isn’t perfect. Sometimes it misinterprets a complex chord or a fast run. That’s where Songscription’s powerful Interactive Editor comes into play.
1. Fixing AI “Hiccups” (Edit Mode)
If you spot a note that sounds a bit off, don’t worry. Click the “Edit” button in the bottom right corner to enter the workshop.
- Adding or Removing Notes: You can interact with the sheet music directly. It’s as simple as clicking where a note should be or deleting one that shouldn’t.
- The Virtual Keyboard: There’s a built-in virtual piano at the bottom of the screen. You can actually “play” the notes to input them, which is much faster than dragging notes around with a mouse.
⚠️ Important: Once you’ve finished your masterpiece, make sure to hit “Save.” There’s nothing worse than losing 20 minutes of fine-tuning because you forgot to save your progress!
2. The Interactive Piano Roll: Transcribing Meets Gaming
If looking at a traditional score feels a bit too “old school” for you, click the “Piano Roll” tab at the top. This is where Songscription turns into a fully interactive, gamified experience.
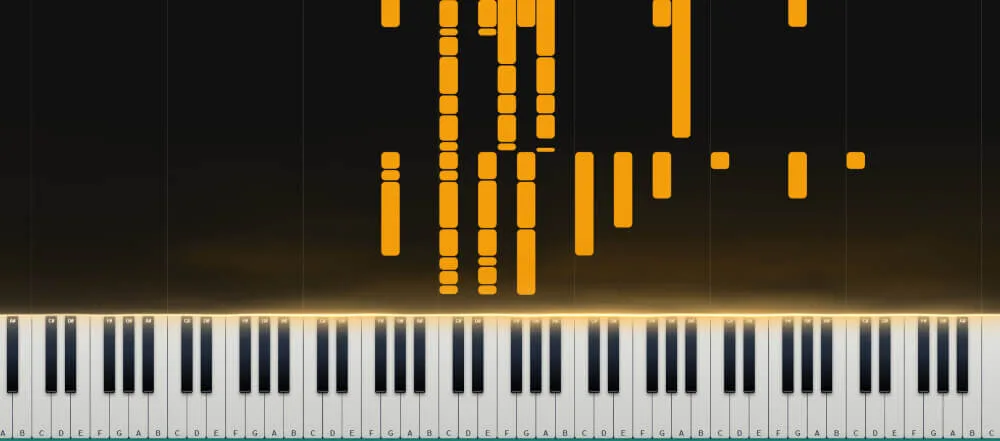
The “Eye Candy” Factor: Visual Effects
Ever seen those mesmerizing piano videos on YouTube where colored bars fall onto the keys? That’s the Waterfall effect, and Songscription has it built-in.
- Why it’s great: Once you toggle on the visual effects, your notes turn into a vibrant stream of colors.
- Pro Customization: You can actually tweak the colors to your liking. If you’re a content creator making piano tutorials, this feature alone will save you hours of post-production work in software like Synthesia.
Real-Time Adjustments & Transposition
Need to shift the song to a different key? No problem. Head over to the Settings menu. When you adjust the pitch or transpose the track, the visual blocks on the Piano Roll move instantly. There’s no lag—what you see is exactly what you’ll hear. This real-time feedback is a lifesaver when you’re trying to find the perfect key for a singer or a specific instrument.
3. Exporting Your Music: What Do You Get for Free?
Finished your edits? It’s time to take your sheet music offline. Hit the “Download” button in the top right corner.
- The Freebie: As a free user, you can export your score as a PDF immediately. This is perfect if you just want to print it out and put it on your piano stand.
- The Paywall: If you need the MIDI or MusicXML files (for further editing in software like Musescore or Ableton), you’ll usually need to upgrade to a paid plan.
Free vs. Pro: How to Maximize the Free Tier
Let’s talk about the “Free Plan” limits and, more importantly, how you can outsmart them.
The Constraints:
- 30-Second Clips: You get unlimited generations for short, 30-second snippets. This is great for testing the AI’s accuracy.
- Full Tracks (Up to 3 mins): You can generate 10 full songs per month, with a daily cap of 5 songs.
🔥 Pro-Tip: How to “Hack” Your Monthly Quota
Don’t just upload a 3-minute song and hope for the best. If you pick the wrong instrument or mode, you’ve just wasted 10% of your monthly credit. Here is the smart way to do it:
- Use “Trial Mode” First: Look for the Trial function in the top right.
- Test the Vibe: Run a 30-second trial using different instruments or modes. Since it’s a trial, it doesn’t count against your monthly quota.
- Go Full Only When Satisfied: Once you’re happy with how the AI handles the melody in Trial mode, then—and only then—switch back to the Free mode to upload the full track.
This simple workflow ensures you don’t burn through your precious 10 credits on experiments that didn’t work out.